Underwear organizer guide: by the end you’ll have a complete plan to select, install, and maintain underwear-specific storage that fits your space. Expect 60–180 minutes for a full setup depending on wardrobe size; this guide assumes basic DIY skills and access to a tape measure and simple tools.
Before you start
- Tools: tape measure (cm/in), soft cloth, vacuum or drawer liner brush, mild detergent, small step stool (if reaching high closets).
- Materials to gather: current underwear inventory (separate by type), labels (paper or adhesive), a notepad to record drawer/dimensions, optional cedar blocks or silica gel packs.
- Decide timing: small dresser — 60 minutes; full wardrobe + seasonal rotation — 2–3 hours.
- Assess your need: Count items by category (bras, briefs, boxers, performance underwear, leggings, shapewear). Write counts and note frequent items (e.g., lingerie worn daily vs. seasonal thermal briefs).
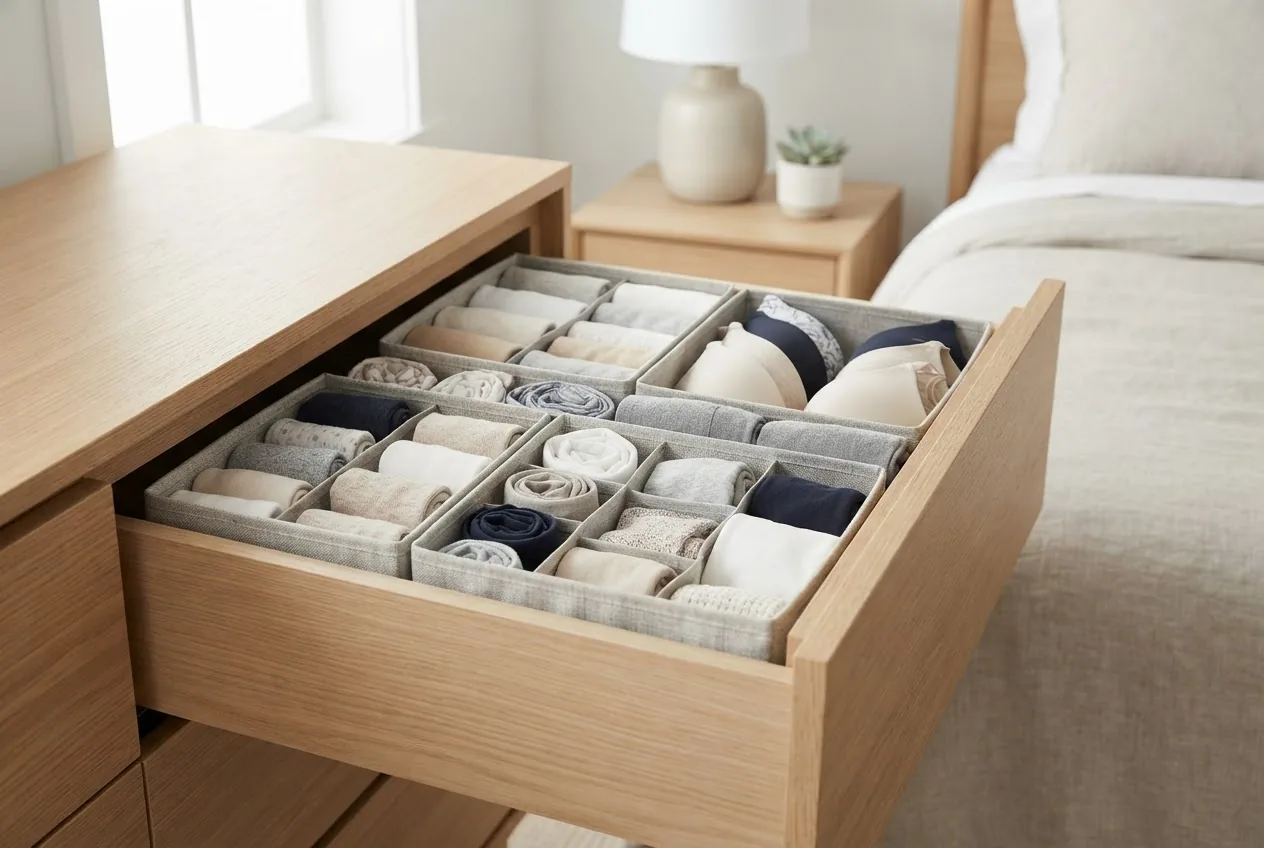
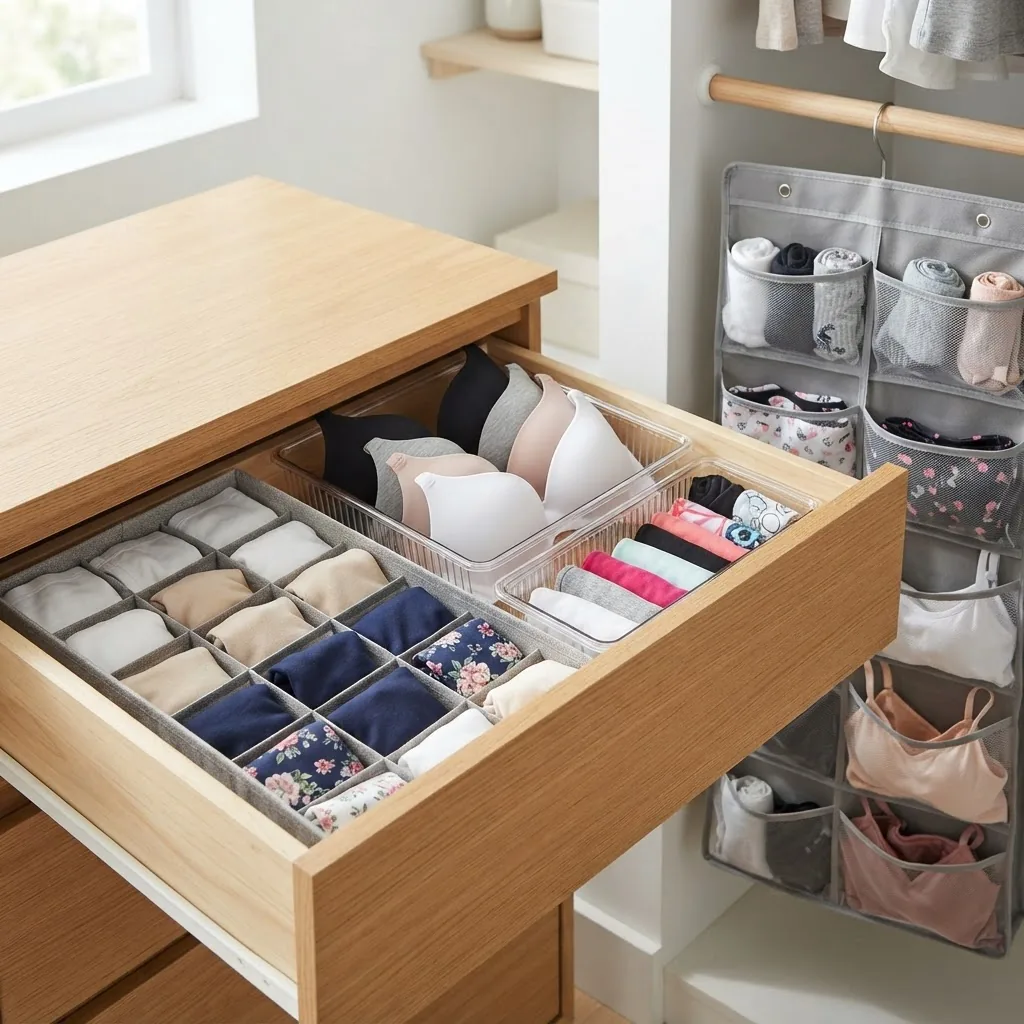
- Match organizer type to use case: Choose drawer inserts for daily-access underwear, hanging organizers for delicate sets or infrequent items, stackable trays for shallow dressers or open-shelf systems.
- Measure and plan layout: Measure drawer interior depth, width, and height to nearest 0.5 cm / 1⁄8 in. Allow 1–2 cm clearance for fabric liners or pouches.
- Purchase or DIY: Select materials (bamboo, breathable fabric, plastic) based on humidity, budget, and sustainability preference; buy one prototype organizer and test before full conversion.
- Implement folding and compartmentalization: Use consistent folding (see Effective Methods) and mark compartments by type with removable labels.
- Maintain and rotate: Schedule 10–15 minute weekly tidyups and a deeper seasonal refresh every 3–6 months depending on climate and usage.
Why You Need an Underwear Organizer
An underwear organizer isn’t just a nicety — it’s a targeted tool for improving daily routines and fabric longevity. When underwear is stored with purpose, you reduce clutter, protect delicate fabrics, and cut morning decision time. Below are the main benefits with practical highlights you can act on immediately.
- Clutter reduction: Compartmentalization prevents mixed piles and accidental stretching from overstacking.
- Wardrobe management: You’ll see gaps, duplicates, and worn items faster, making replacement easier.
- Easy access & time-saving: Visual access increases frequency of use and reduces time spent searching; studies show organized visual systems speed selection tasks (According to a 2024 industry report, consumer time-savings average 3–7 minutes per morning routine).
- Fabric protection: Breathable organizers reduce trapped moisture and friction, extending elastic lifetime.
- Hygiene and odor control: Dedicated compartments let you isolate damp workout underwear and store them with moisture-absorbing packets when necessary.
- Seasonal rotation: An underwear-specific system keeps thermal or swim-specific pieces separated and easy to swap by season.
Transition: now that you know the why, next choose the best organizer type for those specific benefits.
Types of Underwear Organizers and Storage Solutions
Choosing the right physical format depends on drawer dimensions, fabric types, and whether you need stackability or hanging access. Below is a practical comparison of the most underwear-focused organizer types, with pros and cons to help you test one before committing.
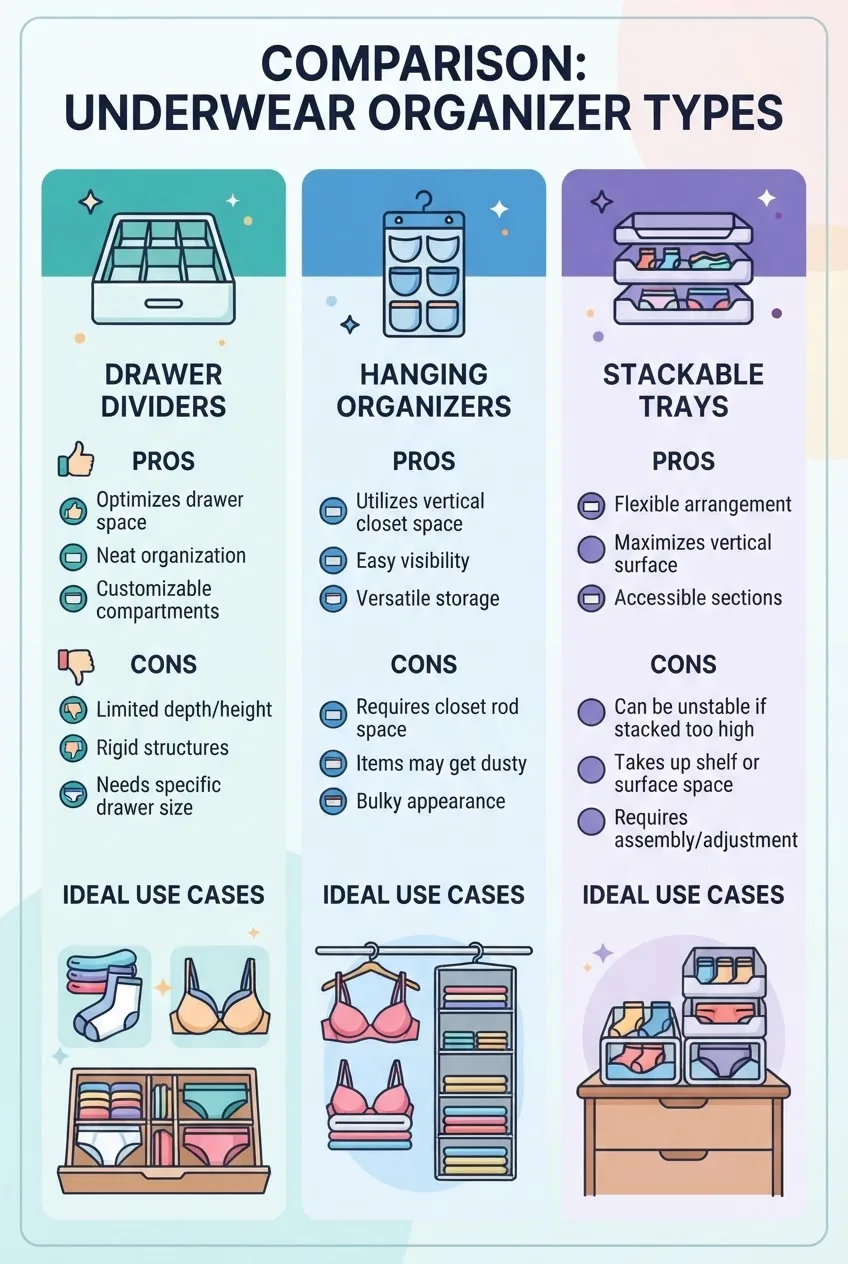
| Type | Pros | Cons | Ideal use |
|---|---|---|---|
| Drawer inserts / dividers |
|
|
Daily underwear access in dressers and chests |
| Hanging organizers |
|
|
Closets with rod space; delicate or seasonal lingerie |
| Stackable trays & clear bins |
|
|
Open shelving, shallow drawers, under-shelf storage |
| Bamboo / wood compartments |
|
|
High-use drawers where aesthetics matter |
| Fold-and-stack soft pouches |
|
|
Travel kits, lingerie drawers, flexible storage needs |
Transition: once you know which type fits your drawer and habits, size and customization come next.
How to Choose the Right Underwear Organizer for Your Needs
Selecting the right organizer requires matching measurements, materials, and budget to your underwear mix. Use this step-by-step decision guide and the critical questions below to avoid returns and wasted space.
- Measure the space: Measure internal drawer width (W), depth (D), and height (H) to nearest 0.5 cm. Leave 5–10 mm clearance on each side for liners. Example: W=80 cm, D=35 cm, H=9 cm — ideal for a 6-compartment bamboo insert or two stackable trays.
- Count and categorize: Tally items by type: bras (by cup size), briefs, boxers, performance underwear, leggings. If bras exceed 8 items, opt for vertical storage or shallow hanging pockets to reduce compression.
- Decide material based on climate: For humid areas choose breathable bamboo or fabric with silica gel packs; for dry areas, plastic trays are fine. Consider “moisture wicking” liners for performance fabrics.
- Set a budget range: Budget options: $10–30 for fabric dividers or plastic trays; mid-range: $30–80 for bamboo or rigid modular systems; premium: $80+ for custom wooden inserts or drawer liners with built-in dividers.
- Check durability needs: For daily-access drawers choose rigid materials (bamboo, wood, ABS plastic) rated for repeated use; for travel or guest drawers, fabric pouches are acceptable.
- Match style and ergonomics: If you prefer visual selection, choose clear trays or open dividers. If you want a minimalist look, concealed hanging organizers in the closet work better.
- Test with a mock-up: Use cardboard cutouts to simulate compartment sizes before buying. Cut cardboard to the measured compartment dimensions and place underwear samples to ensure fit.
- Consider modular systems: Prefab closet organizers and modular inserts let you reconfigure compartments; they pair well with broader systems like the best organizers for room storage. best organizers for room storage
- Account for other garments: If a drawer holds socks and underwear, plan compartments in a 60:40 split or use a separate smaller tray for socks to prevent overflow; align with broader garment and clothing shelf organization practices. garment and clothing shelf organization
- Think about prefab systems: If you want a ready-to-install option, compare sizes to prefab closet organizers and their drawer insert options before purchase. prefab closet organizers
Transition: with the right organizer chosen, follow these practical folding and compartment strategies to make storage repeatable and quick.
Effective Methods for Organizing Underwear Inside Your Organizer
This section gives step-by-step, visual-access focused instructions for folding, compartmentalization, and seasonal rotation. I write this from hands-on trial in tight apartments and large wardrobes; pick the method that matches your space and fabric types.
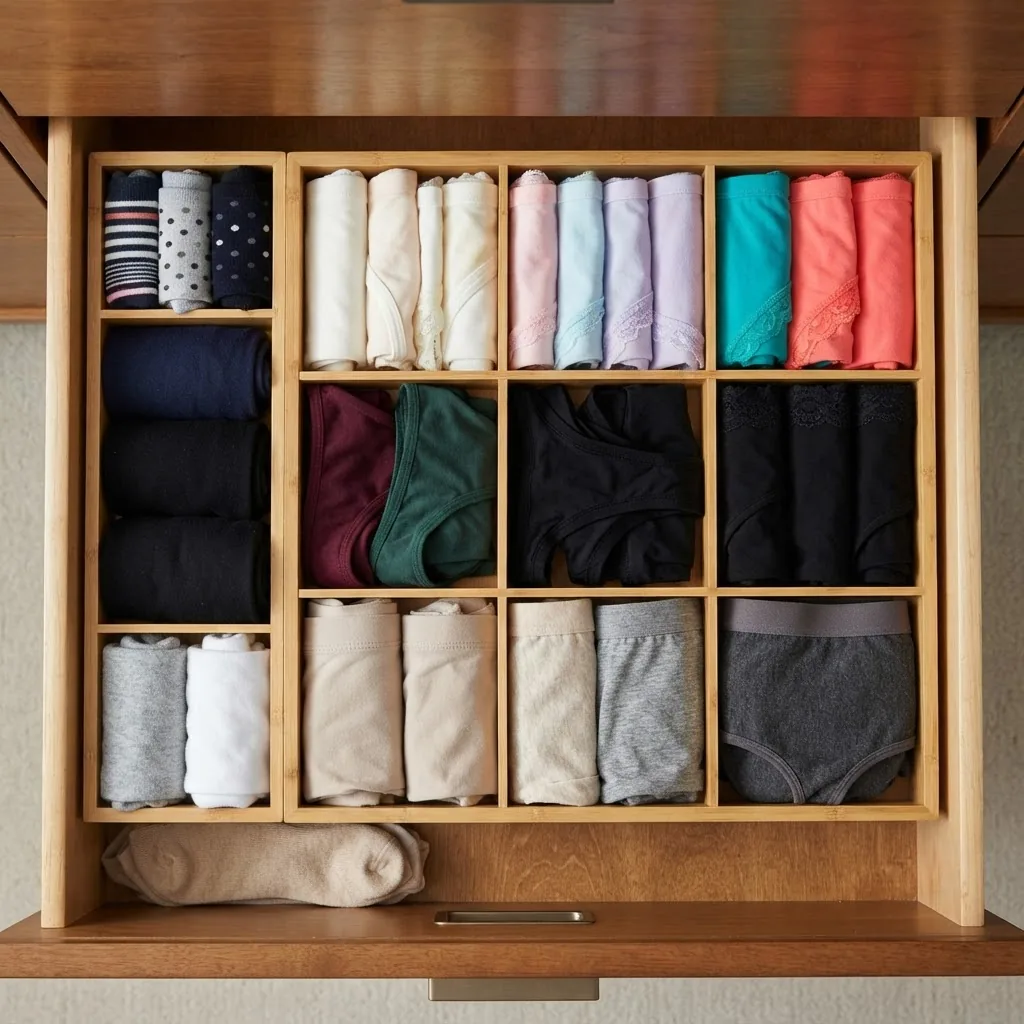
- Sort by category first: Empty the drawer and make piles: bras, briefs, boxers, trunks, performance underwear, leggings/thermals, and single-use items (e.g., shapewear). Count each pile. Note: for bras, sort by structure (wired vs. wireless) because storage needs differ.
- Choose folding techniques by fabric:
- Low-profile briefs & boxers: Fold vertically for file-style access. Steps: (1) Lay flat with front up, (2) fold left and right edges into center, (3) fold in half lengthwise, (4) place standing edge-forward into compartment. This allows instant visual scanning and prevents re-squishing.
- Bras (structured): Stack cups inside each other to preserve shape. For wired bras, clasp them and nest cups; store in a shallow compartment with cushioning if possible. For soft bralettes, roll gently and place in a small pouch.
- Performance underwear: Use a half-fold and file vertically so elastic bands aren’t stressed; allow airflow using breathable dividers with gaps at intervals.
- Leggings & thermals: Fold into thirds and stack flat in a deep compartment, leaving ~1–2 cm headspace to minimize compression on seams and waistbands.
- Compartmentalize by frequency: Place most-used items in the top-left (right-handed reach preference) or top-right for left-handed users. Allocate compartments in approximate ratios: daily basics 50%, specialty/seasonal 25%, spare/guest 25%.
- Label and color-code: Use removable labels on compartments: “Daily Briefs,” “Workout,” “Bras,” “Swim.” For multi-person drawers, color-code edges or use labeled pouches to avoid mixing with siblings’ or roommates’ garments.
- Seasonal rotation method: For seasonal underwear (thermal or swim), implement a 2-bin system: active and storage. Use breathable fabric storage bins for off-season items and transfer every 3–6 months. Store off-season bins in higher closet shelves or basement alternatives if climate-controlled (see alternative storage spaces). alternative storage spaces
- Moisture & odor control inside compartments: Insert a 2–5 g silica gel packet per compartment in humid climates; replace every 6 months. For natural scenting, use one 3×5 cm cedar block per drawer to repel moths and absorb light odors. For heavy sweat odors, air items for 24 hours before storage and add activated charcoal sachets to the compartment.
- Preventing cross-contamination: Keep damp or recently laundered workout underwear in a ventilated pouch for 24–48 hours before placing them into fabric-lined compartments; this minimizes odor build-up and reduces microbial growth (According to a 2023 textile care report, storing damp textiles increases odor incidence by up to 60% in 72 hours).
- File vs. stack rule: File (vertical) every item you want quick access to; stack (horizontal) bulk or seldom-used items. Example: file briefs and boxers; stack leggings and long underwear.
- Special items and lingerie care: For delicate lingerie, use mesh hanging pockets inside your closet or a dedicated top-drawer lined with acid-free tissue. If you own more than 12 structured bras, reserve a 40–50 cm wide drawer with soft lining and individual cups to preserve shape.
- Travel and portable organization: Pack underwear in a small foldable pouch organized by day (e.g., 7 compartments for a week). For business travel, reserve one compact pouch for unwashed items and one for clean; this prevents mixing and odor transfer in luggage.
Transition: setting the system up is one step — keeping it fresh and functioning requires systematic maintenance.
Maintenance and Care for Your Underwear Organizer
Routine maintenance preserves fabric quality and organizer lifespan. Below are practical cleaning schedules, odor-control tactics, and professional options if your needs exceed DIY measures.
- Weekly quick tidy (10–15 minutes): Refile displaced items, check for damp garments, replace any used silica gel packets placed in active compartments.
- Monthly deep clean (30–45 minutes): Remove organizers: vacuum drawer, wipe with mild detergent (1 tsp mild detergent per 1 L warm water), air dry 1–2 hours before returning items. For wooden or bamboo organizers, wipe with a slightly damp cloth only and dry immediately to prevent warping.
- Seasonal refresh (every 3–6 months): Rotate seasonal underwear, launder items at recommended settings, inspect elastic and seams, mend or discard worn items.
- Odor elimination: For persistent odors, wash textiles using appropriate cycles for fabric; machine-washable organizers can be laundered on gentle cycles. For non-washable wooden or plastic trays, wipe with diluted white vinegar (1:4 vinegar:water), then air-dry fully.
When DIY isn’t enough: for large-scale reorganization or stubborn bio-odors, consider professional help. commercial cleaning and disinfection services can provide deep fabric hygiene using industrial-grade methods.
You can also hire organizers for design and execution via professional home organization services. For fabric care guidance and sustainability guidance, consult external resources such as Textile Exchange, National Association of Productivity & Organizing Professionals (NAPO), and ergonomics research at NIOSH.
Care disclaimers: certain organizer types have limitations based on climate and drawer construction — for example, solid plastic trays can trap moisture in humid basements, and heavy wooden inserts can exceed old drawer runners’ weight limits. If your climate average humidity exceeds 65% year-round, prefer breathable bamboo or fabric-based organizers.
Transition: beyond the drawer, there are creative places and systems that work better for specific underwear use-cases.
Creative Storage Ideas Beyond the Drawer
When drawers are full or you prefer closet-based systems, these creative storage solutions maintain organization and protect garments while using vertical or alternative spaces.
- Closet hanging organizers: Use soft hanging pockets for lingerie and swimwear to free drawer space; pair with a freestanding closet systems module for flexible placement. freestanding closet systems
- Under-bed modular boxes: Shallow stackable trays or fabric boxes work well for off-season underwear—label fronts for fast retrieval.
- Lockable solutions: For shared spaces or dorms, a lockable locker or cabinet provides privacy and security. Consider secure storage options for sensitive items. secure storage options
- Basement and alternative storage: If your basement is climate-controlled, use it for long-term seasonal storage in breathable containers; otherwise avoid basements due to dampness. See our guide to alternative storage spaces. alternative storage spaces
- Maximizing vertical space: Mount stacked trays on open shelving or use wall-mounted pocket systems to achieve maximized storage space ideas. maximized storage space ideas
- Portable and travel solutions: Use labeled pouches organized by day-of-week for short trips and separate pouch for used items to keep clean gear from soiled.
Transition: cost and sustainability are often deciding factors; here are practical, budget-conscious, and eco-friendly solutions.
Budget-Friendly and Sustainable Underwear Organizer Options
Eco-conscious and budget options can be durable and attractive. Below are tested approaches including DIY ideas and materials pros/cons for each option.
- Recycled fabric dividers: Brief description: dividers made from recycled polyester or cotton blends. Pros: low-cost, lightweight. Cons: may sag without internal support. Related option: fabric cube storage for open-shelf underwear storage. fabric cube storage
- DIY cardboard inserts: Description: cut corrugated cardboard to drawer dimensions and wrap in cloth. Pros: near-zero cost and fully customizable. Cons: limited longevity; replace every 6–12 months.
- Secondhand wooden trays: Description: purchase or upcycle used wooden drawer inserts. Pros: durable and aesthetic. Cons: variable condition; inspect for splinters or pests. For durable material discussions, see durable storage solutions. durable storage solutions
- Stackable clear plastic bins (budget): Description: low-cost modular trays, often under $20 each. Pros: transparent, easy to clean. Cons: less breathable — add silica gel in humid climates; see advice on durable plastic shelves for long-term plastic solutions. durable plastic shelves
- Efficient small-space organizers: Description: multipurpose trays designed for compact spaces; often under $25. Pros: great for apartments; cons: smaller compartments may require more frequent rotation. See efficient small space organizers for cross-use ideas. efficient small space organizers
Transition: after implementation, expect a short learning curve; here are common mistakes and how I avoid them.
Common mistakes and how to avoid them
I’ve seen these errors in real projects — here’s what I say when they show up.
- Overfilling compartments: I once forced a six-compartment insert into a crowded drawer; elastic bands stretched and lost shape within months. Fix: measure and allow 10–20% headspace per compartment.
- Buying before measuring: I bought a ready-made bamboo tray that was 2 cm too wide for my dresser. Fix: always do a cardboard mock-up with underwear samples.
- Ignoring humidity: I stored plastic trays in a damp basement and returned to mildew. Fix: choose breathable materials or controlled storage environments; use silica gel packs and cedar blocks.
- Skipping a test run: I converted an entire closet without piloting a layout and had to reorder parts. Fix: buy one prototype organizer and trial for 2–4 weeks.
Quick checklist
- Measured drawer W × D × H and left 5–10 mm clearance.
- Counted underwear by category and selected compartment ratios.
- Picked materials matching climate (bamboo/fabric for humid zones).
- Implemented folding: file briefs/boxers; stack leggings/thermals.
- Placed silica gel/cedar blocks and scheduled maintenance (weekly/monthly/seasonal).
- Labelled compartments and tested one prototype organizer for 2–4 weeks.
When to call a professional
Call in professional organizers if you have more than 3 shared users per storage space, complex wardrobe systems exceeding 200 items, or persistent odors after thorough DIY cleaning. For professional help with setup and deep hygiene, consider engaging recognized services documented by industry bodies, or view the local professional home organization services directory. professional home organization services
Final takeaway: focus on measuring, testing one organizer, and building simple maintenance habits; these three actions deliver the largest improvements in neatness and fabric longevity.