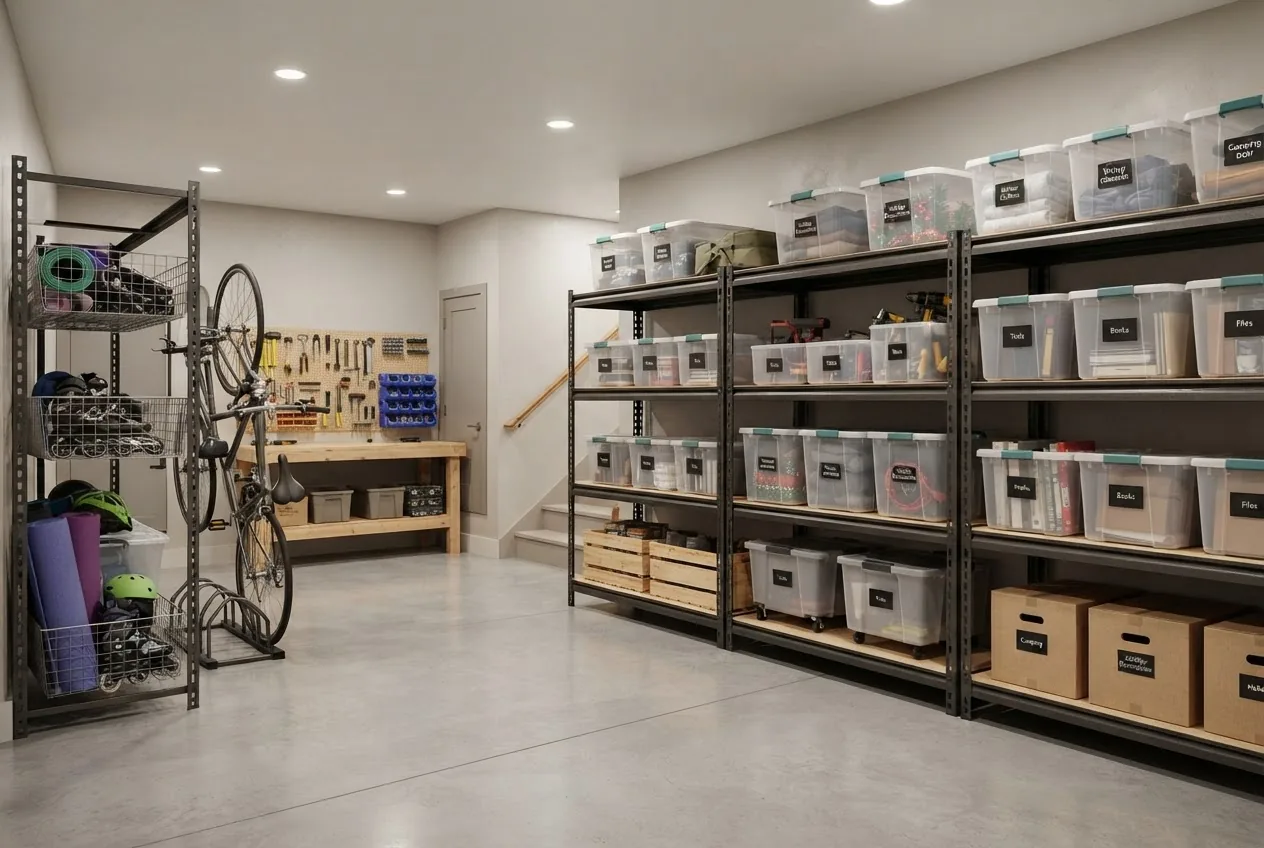
Basement storage mastery: by the end you’ll have a clear, actionable plan to prepare, organize, and maintain basement storage for a typical 200–600 sq ft space; expect 6–18 hours of hands-on work (spread over 1–3 days) and basic DIY skills (measuring, simple shelving assembly, sealing). This hands-on guide assumes beginner-to-intermediate skill and focuses on practical, safe steps you can do yourself.
Before you start
- Measure space: tape measure, laser measure (record length, width, ceiling height, and window/waterpipe locations).
- Tools: drill, level, stud finder, shop vacuum, utility knife, caulk gun, basic wrench set, safety goggles, gloves.
- Materials: 6-mil polyethylene vapor barrier roll, masonry sealant, silicone caulk, moisture meter, dehumidifier (capacity 30–70 pints depending on space), plastic stackable bins, anti-pest traps, shelf anchors, labeled adhesive tags.
- Personal: wear a dust mask (N95), knee pads, and bring a helper for heavy lifts.
Transition: prepare carefully, then choose systems that match your actual basement conditions — finished, unfinished, or damp — before you commit to racks or cabinetry.
Understanding Basement Storage Challenges
Basements present unique obstacles for storage: variable temperature, higher relative humidity, possible water intrusion, limited lighting, and different finishes (unfinished vs finished basements). Addressing these affects what you store, where, and how you protect items.
Moisture and humidity control are the top concerns. Cold concrete walls and floors create condensation when warm indoor air meets cool surfaces, raising basement humidity and encouraging mold. Mechanical systems like dehumidifiers, exhaust fans, and proper HVAC balancing reduce moisture; aim for a steady relative humidity (RH) of 45% or lower to limit mold growth and protect fabrics and paper.
Unfinished basements often have exposed framing, concrete floors, and limited insulation; these spaces are more prone to dust, pest access, and seepage. Finished basements with drywall and flooring reduce dust and look neater but can hide leaks and mold behind walls. Limited lighting makes retrieval and safe access harder — plan task lighting at aisles and near frequently used zones.
Pest control is a constant basement issue: rodents and insects seek shelter in sheltered, cluttered spaces. Seal entry points, keep cardboard minimal, and use plastic containers where possible. For serious pest problems, consult a licensed pest control professional.
Safety considerations include trip hazards, chemical storage (e.g., paints, fertilizers) away from living spaces, and clear access to utility panels and egress points. Building code guidance warns against obstructing required exits and utility access; consult code sources for specific requirements — for example, the International Code Council provides basement and egress guidance for homeowners and contractors.
According to the International Code Council 2024 guidelines, maintain clear access to egress windows and utility panels and avoid creating concealed spaces that could hide damage (International Code Council).
Real-world scenario: a homeowner converted a damp 300 sq ft unfinished basement into a tidy storage zone by installing a 30-pint dehumidifier set to 45% RH, raising electronics on metal shelving 6″ off the floor, and sealing a hairline crack with hydraulic cement — eliminating seasonal musty smells within two weeks.
Transition: after you understand these challenges, the next step is to prepare the basement thoroughly — the most important time investment for long-lasting storage success.
Preparing Your Basement for Storage

Preparation is a sequence of measurable actions: inspect, repair, control moisture, clean, and make the space pest- and storage-ready. Follow the numbered checklist below; each step includes target values, products, and timing.
- Inspect and document issues. Walk the space with a flashlight, camera, and moisture meter. Record visible cracks, efflorescence, stains, mold spots, and the location of sump pumps and drainage. If you detect standing water or recurrent seepage, schedule a professional inspection.
- Repair structural and water-entry points. Fill hairline to 1/4″ cracks with hydraulic cement; for larger cracks consult a structural pro. Caulk around window frames and pipe penetrations with latex-silicone caulk. For foundation seepage, apply a masonry waterproofer to interior walls per manufacturer’s instructions.
- Install or verify drainage and sump systems. If your basement floods or has seasonal seepage, check the sump pump is rated for your home and test monthly. Consider a battery backup for sump systems in areas with frequent outages. According to a 2024 industry report on residential waterproofing, homes with functioning sump and perimeter drains reduce interior seepage incidents by over 70%.
- Set up a vapor barrier. Lay a 6-mil polyethylene sheet on concrete floors and extend it up the wall 4–6 inches, taped at seams with waterproof tape for finished-work protection. For finished basements, focus on wall sealing and insulating the rim joist with closed-cell spray foam or foam board to reduce condensation.
- Control humidity with a dehumidifier. Choose capacity by space volume: 30–50 pints for 500 sq ft with normal dampness; 50–70 pints for large, damper basements or finished spaces. Set target RH to 40–45%. Empty a gravity bucket daily or install a condensate pump/drain to a floor drain for unattended operation.
- Clean and disinfect surfaces. Scrub concrete and masonry with trisodium phosphate (TSP) solution or a commercial masonry cleaner, rinse, and dry thoroughly. For persistent contaminants or post-water intrusion sanitization consider professional cleaning. professional basement cleaning and disinfection
- Upgrade lighting and electrical access. Install LED shop lights at 3–4 foot intervals in aisles; add switched outlets near shelving for battery chargers. Confirm all fixtures and outlets are GFCI-protected if within 6 feet of potential water sources.
- Address pests and rodents. Seal gaps >1/4″ with copper mesh or hydraulic cement; store food and animal feed in airtight plastic bins. Use glue traps or bait stations per label instructions and consult a licensed pest control operator for infestations.
- Choose flooring solutions. If the floor is uneven or cold, consider interlocking elevated vinyl tiles or pallet-style risers to keep stored items off concrete; raising boxes 4–6 inches reduces moisture transfer and makes cleaning easier.
- Plan layout and zoning. Sketch a diagram marking high-risk zones (near lateral drains, sump, HVAC) and preferred storage zones (shelves along dry, interior walls). Reserve 36-inch wide aisles for safe movement and 3-foot clearance around furnaces, water heaters, and electrical panels.
Tip: use a handheld moisture meter to confirm surfaces are <50% moisture content before placing cardboard or fabric; for electronics, ensure RH is consistently below 50% for at least 48 hours.
Transition: with a prepared, dry, and lit space, you can choose the right storage solutions that match your basement conditions and access needs.
Essential Basement Storage Solutions Overview

Below is a practical comparison of common storage solution categories, emphasizing suitability for basement environments. Use this table to match needs (weight, moisture exposure, access frequency) with the right system.
| Solution | Pros | Cons / Basement notes |
|---|---|---|
| Metal shelving (steel) | High weight capacity, resists mold, adjustable shelves; long-lived. | May rust in very damp basements — use powder-coated or stainless options and raise 1–2″ off floor. |
| Wire shelving | Airflow reduces condensation; lightweight and adjustable. | Smaller items can fall through — use liners; check coatings for corrosion resistance. |
| Plastic shelving / resin units | Moisture-proof, won’t rust; inexpensive; good for damp areas. | Lower load capacity; can deform under heavy weight or heat. |
| Stackable storage bins (plastic) | Water-resistant, available clear options, easy stacking and labeling. | Watch lid seals and avoid cardboard inside; opaque bins can hide contents. |
| Wall-mounted organizers and pegboards | Keeps floor clear, great for tools and sports gear; customizable. | Requires studs or masonry anchors; avoid heavy loads on drywall in damp basements. |
| Cabinets (metal or plastic) | Conceal clutter; lockable for chemicals or valuables; robust options exist. | Metal cabinets can rust; wooden cabinets can warp in moisture — use engineered materials for damp sites. |
| Ceiling-mounted storage / overhead racks | Great for seasonal bins; uses underused headspace. | Requires secure attachment to joists; limits ceiling clearance and may increase condensation risk on cold items. |
For an overview of adaptable organizer choices across rooms and uses, see the best types of organizers.
Transition: once you know the solution categories, apply them by basement zone — corners, walls, under stairs, and ceiling areas each need tailored systems.
Selecting the Right Storage Systems for Different Basement Areas
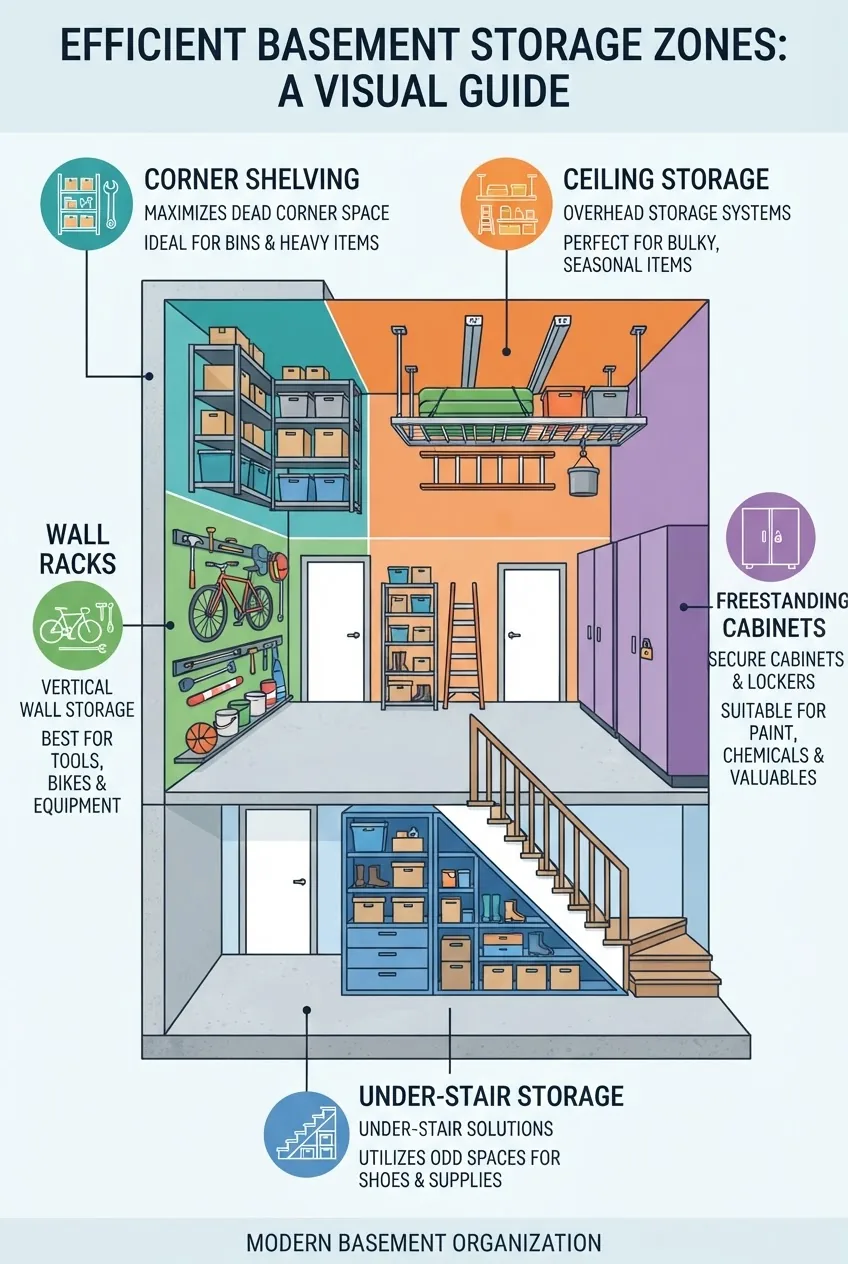
Match storage systems to basement areas using these practical rules: heavy, infrequently used items go low and centered; lightweight, frequently accessed items go at eye level; items vulnerable to moisture go on metal/plastic shelving 4–8 inches above the floor or in sealed bins.
Corner shelving
- Why use it: Efficient footprint use for odd spaces; good for bulk items like paint and garden supplies.
- Choose steel corner shelving with powder coat; anchor to walls with masonry anchors if concrete.
- Use sealed plastic bins for seasonal decor stored in corners with occasional dampness.
Wall-mounted racks and pegboards
- Why use it: Keeps tools, cords, and small equipment visible and accessible; preserves floor area.
- Mount into studs or concrete anchors; use slatwall or metal rail systems for heavy items. For guidance on garage-style solutions that work well in basements, see the wall-mounted garage organizers.
Freestanding cabinets and shelving
- Why use it: Flexible and relocatable; locks and enclosed doors protect from dust and pests.
- Consider garage-grade cabinets for durability: durable cabinet storage solutions.
- For adaptable closet-like configurations, review options in the freestanding storage systems.
Under-stair storage
- Why use it: Often wasted space great for labeled bins and seasonal items.
- Install shallow shelving and drawer units; keep chemicals and flammables out of under-stair enclosures if egress or furnace access is nearby.
Ceiling and overhead storage
- Why use it: Excellent for long-term, light seasonal bins (holiday decorations, camping gear).
- Securely fasten racks to joists; avoid storing heavy items over high-traffic zones.
Consider fabric alternatives for low-moisture basements — see cube storage options — but avoid fabric cubes in damp or unconditioned basements.
Transition: now that zones and systems are matched, apply organization best practices for labeling, rotation, and accessibility.
Organizing Tips and Best Practices for Basement Storage
Good organization is repeatable: label, sort by frequency, and create a maintenance cadence. Use the checklist below as operational rules when placing items.
- Sort and purge first. Keep, donate, recycle, or dispose. For clothing and textiles, follow the guidelines in the garment and textile storage.
- Group by category and frequency. Place weekly-use items within easy reach (shelf height 36–60 inches). Store seasonal and rarely used items on top shelves or overhead.
- Label everything consistently. Use large printed labels with category, month stored, and a short contents list. For example: “HOL: Winter lights — 11/2026 — LED bulbs inside”. Use clear bin fronts for quick visual identification.
- Use a master inventory list. Maintain a simple spreadsheet or note app mapping bin ID to contents and location. Index by zone and include photos for quick retrieval from a smartphone.
- Stack smart and safe. Heavy items on lower shelves; never stack beyond the stability limit (no more than 3 plastic bins high if each is >18″ wide). For tall stacks, use shelving with lip edges or straps.
- Implement seasonal rotation. Schedule a 30–60 minute rotation each spring and fall to swap frequently used seasonal items and check for moisture or pests.
- Label access levels. Use color-coded labels for “Immediate (green)”, “Seasonal (yellow)”, “Long-term (red)” so helpers or family can find things quickly.
- Safe chemical and tool storage. Store paints, solvents, and fertilizers in a locked cabinet rated for chemical storage, away from heat sources and living areas. Keep tools on pegboards with secure hooks and ensure sharp blades are sheathed or stored in locked containers.
2>
Transition: next we apply these practices to common item categories with targeted solutions and step-by-step placement tips.
Specialized Storage Solutions for Common Basement Items
Below are item-specific recommendations and step-by-step actions to protect, access, and organize common categories found in basements.
Tools and hardware
- Mount a tool wall. Install a 4×8′ pegboard anchored to studs or a 30″ metal slatwall; hang common tools by frequency. Use labeled bins for screws, nuts, and bolts stored on a shelf below the wall.
- Use smaller parts organizers. For small hardware, employ stackable drawer boxes with clear fronts and compartments; tie to the workbench with a bungee to avoid falls.
- Secure heavy equipment. Bolt heavy items like bench grinders to the bench; store power tool batteries on a ventilated shelf near an outlet for charging.
- For drawer organization tips for small tools and parts, see efficient drawer storage solutions.
Holiday decorations and seasonal decor
- Use clear stackable bins. Pack by room or decoration type; nest fragile items with paper or bubble wrap and store lights with cord wraps to avoid tangles.
- Label with last-used year. Example label: “HOL-LIGHTS-2025”. Keep a photo of wrapped contents in your inventory.
- Store off the floor. Keep bins on shelving at least 4–8″ above the floor to avoid puddle damage.
Clothing and textiles
- Clean before storage. Wash and fully dry textiles to avoid mold. Use garment bags or vacuum-sealed bags with silica gel packets. For detailed textile care, consult proper clothes storage techniques.
- Use breathable options when long-term. For valuable fabrics, avoid long-term vacuum sealing — opt for cotton garment bags with desiccant packs and store elevated.
Sports equipment
- Designate a gear zone. Use wall hooks for bikes, overhead racks for kayaks, and cubbies for balls. Clean and dry equipment before storage to reduce rust and mold.
Gardening supplies
- Store chemicals in a ventilated cabinet. Keep pesticides and fertilizers in original containers, labeled, and locked away from children and pets.
- Use open shelving for pots and soil bags. Place soil bags on pallets to avoid moisture absorption from floor.
Hobby and craft materials
- Sort by fragility and humidity sensitivity. Paper and inks need dry, stable RH — keep in sealed bins with silica gel.
- Use shallow drawers and modular boxes. For delicate art supplies, follow practices in the organized storage for hobby and craft materials.
Practical example: I stored a family of winter textiles in clear, lidded plastic bins on a metal shelf raised 6″ on plastic risers, set a dehumidifier to 45% RH, and recorded bin contents in a smartphone photo inventory — retrieval time dropped from 20 minutes to under 5.
Transition: once items are placed, adopt a maintenance plan to protect them long-term.
Maintaining Your Basement Storage Space
Maintenance prevents small problems from becoming large failures. Create a quarterly and annual checklist to monitor moisture, pests, and structural issues.
- Quarterly checks (every 3 months): Inspect for new water stains, smell mustiness, and damaged lids. Check dehumidifier coils and empty or inspect condensate lines. Record RH readings; keep them between 35–50%.
- Monthly checks: Walk aisles, confirm no boxes touching walls, test sump pump operation (run and confirm discharge), and inspect for pest signs.
- Annual tasks: Deep clean shelving and floor, reseal any masonry coatings if needed, and review inventory — purge items not used in 3+ years.
For guidance on mold assessment and indoor air quality, consult environmental health resources — for example, the EPA provides guidance on mold remediation and moisture control (EPA: Mold Resources), and recommends professional remediation for extensive contamination (visible mold >10 sq ft).
Checklist for a maintenance visit:
- Inspect all seals and caulking. Reseal as necessary.
- Verify dehumidifier performance. Clean filters, set RH to 40–45% for most stored items.
- Check inventory list and photograph any high-value items.
- Test smoke and CO detectors if basement contains utilities.
Transition: weigh costs and complexity when deciding DIY vs hiring pros — the next section helps you choose.
Cost Considerations and DIY vs Professional Help
Estimate ranges for a typical 300–500 sq ft basement:
- Basic prep supplies (sealants, caulk, vapor barrier): $75–$250.
- Mid-range shelving and bins (metal shelving + 8–12 clear bins): $300–$800.
- Dehumidifier: $200–$700 depending on capacity (30–70 pints).
- Professional waterproofing or major repairs: $1,500–$10,000 depending on exterior excavation or interior drain systems.
DIY is cost-effective for cleaning, shelving assembly, sealing small cracks, and installing a dehumidifier. Hire professionals when you find structural cracks, active seepage, or visible mold covering large areas. For full-space organization or complex installs, consider professional organizers; see guidance on professional organization services for scope and cost benchmarks.
Decision guidance:
- DIY: under $1,000, non-structural, no active water damage, and you have time/skills.
- Professional: visible mold >10 sq ft, recurrent flooding, unsure about structural integrity, or when desired finish is high-end (custom cabinetry or electrical work).
Transition: final section below summarizes and gives action points to implement now.
Summary and Next Steps for Effective Basement Storage
Key takeaways: prepare the space (seal, control moisture, clean), choose durable storage systems matched to zones and items, implement labeling and inventory, and maintain a quarterly schedule. Start with a single zone (e.g., tool wall or seasonal bin shelf), confirm RH under 50% with a dehumidifier set to 40–45%, and expand in phases.
Common mistakes and how to avoid them
I’ve often seen a homeowner stack cardboard boxes directly on concrete; the result was damp-bloom and ruined contents. I now always raise boxes at least 4–6″ and use plastic bins for anything valuable. Another frequent error I encountered was under-sizing the dehumidifier; a 30-pint unit in a finished 600 sq ft basement left humidity at 60% — choose capacity based on room volume and consult product specs.
Final checklist (verify these before you finish)
- All stored items are off the floor by at least 4–6 inches.
- Dehumidifier installed and set to 40–45% RH and functioning.
- Inventory sheet updated with photos and bin IDs.
- Paths and 36″ aisles clear; utility access unobstructed.
- High-risk items (chemicals, fuels) locked in rated cabinets.
When to call in a professional
Hire a professional when you find active leaks, structural cracks wider than 1/4″, visible mold >10 sq ft, recurring sump failures, or if you plan major electrical or plumbing changes. For waterproofing and safety code questions consult the International Code Council (ICCC guidance) and for mold remediation consult EPA resources (EPA: Mold Resources).
Next action: pick one zone (36″ aisle, a 4×8′ shelving wall, or an under-stair unit), buy one dehumidifier sized for your space, and block two half-days to execute Steps 1–4 from the Preparing checklist. Small, staged changes reduce risk and give quick wins.
References and further authority: guidance from the International Code Council, EPA mold resources, and organizing standards from the National Association of Productivity & Organizing Professionals inform the recommendations above (NAPO).